Gliding with your boat across rough water would have been tricky without trim tab switch innovations from Lenco. Other brands offer trim tab switches, but boaters rate Lenco old style switches higher than several options.
The old-style Lenco trim tab switch has a signature rocker design boaters prefer to new models. However, the trim tab actuator on old and new Lenco trim tab switches perform identical functions.
In this article, you’ll get relevant information about the Lenco trim tab switch and all it has to offer. The information in this piece makes it easy to purchase, install, and use Lenco trim tab switches with relative ease.
How Does a Lenco Trim Tab Switch Work?
Lenco trim tabs work with a basic designed essential to the smooth performance of vessels. A standard trim tab comes with a couple of lightweight steel planes designed with actuators on a vessel’s transom.
Lowering the trim tab will help redirect the water flow around your vessel. When the trim tabs get lowered, an upward force is created at your vessel’s stern level.
A rising stern will keep the boat’s bow lower, enabling smoother and efficient sailing across water.
How to Replace Lenco Trim Tab Switch
Step 1: Get a suitable replacement
Some Lenco trim tab switches have special features like indicators and LED lighting many boaters may seek. Select a switch that’s a perfect fit for your already-installed actuator and trim tab.
Step 2: Remove the old trim tab switch
In most vessels, the trim tab switch is usually placed close to your ignition assembly and other controls. Get a flat or star screwdriver and loosen nuts holding the panel of your boat’s control area.
Next, remove the trim tab switch from the inner part of your boat’s control panel. Most trim tab switches are installed with hand-tightened bezel nuts underneath your boat’s helm area.
Step 3: Install new trim tab switch
Next, fit the new trim tab into the helm and connect its wiring properly. You’ll also have to tighten the new switch properly with a new bezel nut to secure it in its place.
How to Install Lenco Trim Tab Switch Old Model
Step 1: Install the trim tab
To install the trim tab, you’ll need to have a special set of drilling bits and other tools. A complete kit will come with two actuators and trim tabs to fit on your boat’s starboard and larboard sides.
If the trim tabs have already been installed on your boat, you can skip this step.
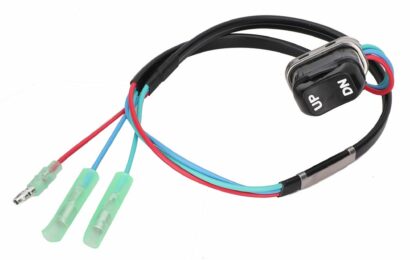
Step 2: Connect actuator-extension wiring
Next, install the wiring into your trim tab’s deutsche connector. The white wire goes into the compartment marked ‘1’ while the other goes into a second compartment marked as ‘2’.
Install rubber seal and locking tab on deutsche connector. Insert deutsche connector into extension harness.
Mark extension harnesses for each actuator to know which side is the starboard and portside of your trim kits. If these have been pre-marked, skip and move to the next step.
Step 3: Drill hole into boat helm
You’ll need to get 2/16” hole saw and drill a hole into your boat’s helm. Make sure the hole has a 4” depth and all wires are moved from the drilling area.
Connect the wiring harness from your boat’s actuators onto the extension and then to your switch connectors.
Step 4: Connect to power supply
Next, connect the orange ignition sensor wire. The wire ensures the switch kit works properly when your boat’s engine is on.
You can connect the orange sensor to the accessory side of your boat’s key switch. The orange wire will also work properly when connected to a 12V on/off switch.
Note that the portside switch operates the starboard side of your trim tab. Also, the starboard side switch operates the portside of your trim tab.
Best Lenco Trim Tab Switch with Indicator
The Lenco 12” X 12” Edgemount Trim Tab Kit offers an indicator function many boaters seek on their vessels. The entire kit provides a full replacement to your vessel’s tilt and trim systems.
Boaters keen on the latest models of Lenco trim tab switches with an indicator have several options from Lenco Marine.
Trim tab switch kits with indicators also come in 9” X 9” and 9” X 12” variants. Boaters searching for a switch without its mount can also get replacement parts from WestMarine, Amazon, and other stores.
A complete Lenco trim tab switch kit (with mount) sells at $600 to $2000. Replacement trim tab switch kits from Lenco (without mount) usually sell for about $80 to $300+.
How to Use Lenco Trim Tabs in Rough Water when Taking Off
Step 1: Power up your engine
Start your boat’s engine with its ignition to power up the installed trim tabs.
Step 2: Lower trim tabs
Press the down button on your switch’s portside (operates starboard side trim tab). Next, press the down button on your switch’s starboard side (operates portside trim tab).
Step 3: Move your vessel
Lowering the trim tabs on your boat makes it possible to sail across rough waters. Move your vessel to glide easily across water, even in rough areas.