Open Broadcaster Software (OBS) is a popular app best known as an option to support multiple scenes and sources in one stream. Tons of settings are available in the OBS app to allow easy customization, and default resets are offered too.
You can reset OBS settings directly by deleting all files in the File > Show Settings Folder path. Also, OBS users can also reset settings to defaults across individual setup menus available in most versions.
Resetting OBS settings to defaults is possible with few simple steps. However, OBS users must get vital information to reset their streaming and recording apps with ease.
That’s why this guide looks at the easiest ways to reset OBS for different use cases. OBS users can take advantage of these settings to maximize streams and other output with ease.
Can I Reset OBS Settings?
OBS settings can be reset directly, by deleting specific cached folders in your computer, or through individual preset rollbacks. Blanket resets will remove most or all OBS custom settings while individual resets will delete few preferences.
How to Reset OBS UI
Step 1: Open OBS
Launch the OBS app on your PC (Windows 7 or higher, Linux, and macOS devices). After launching the OBS app, its main window with a preview screen, scenes, sources, and settings will be on display.
Step 2: Click View
From the list of menu items, click View to open a dropdown menu. After clicking View, select Docks from all options available.
Step 3: Click Reset UI
Next, click on Reset UI to complete rolling back your OBS user interface to its default settings.
How to Reset OBS Studio with Default Settings
It’s worth noting that deleting OBS cached files will reset your preferences and every setting you have ever made. It’s best to save your custom setup options in a note somewhere before using this method.
Step 1: Go to This PC
Click My Computer (Windows 7) or This PC (Windows 8 and later). You need to click the Start orb (bottom left corner) to access these settings.
Step 2: Click on your main storage drive
Locate the storage drive where your OS is installed. Make sure you can view hidden files before proceeding to other steps.
Step 3: Click Users
Click on the Users folder, then AppData, and then Roaming. Highlight the obs-studio folder and delete everything in it.
You can also bypass steps 1 – 5 by using the Windows + R shortcut to open Windows Run. Next, type %appdata% and click OK to access the Roaming folder containing obs-studio directly.
How to Reset OBS Settings to Pick Up Devices
Step 1: Update relevant device driver software
Open Device Manager settings on your computer and update all relevant driver software. After all software updates, restart your system before going onto the next step.
Step 2: Close OBS
Next, close OBS and other programs on your computer before proceeding to the next step.
Step 3: Go to This PC
Go to My Computer (Windows 7) or This PC (Windows 8 or later).
Step 4: Select main storage drive
Choose the storage drive with your OS installed in it. Make sure your settings allows you to see hidden files and folders.
Step 5: Click Users
Next, select Users from the list of options.
Step 6: Click AppData
In the next section, click AppData and then Roaming.
Step 7: Delete obs-studio
Next, delete everything in the ‘obs-studio’ folder.
Step 8: Restart OBS
After deleting the ‘obs-studio’ cached folder, restart the app on your system.
Step 10: Go to Sources and click ‘+’
Next, go to Sources and click ‘+’ to add preferred image, video, and audio sources.
Step 11: Add a device and click OK
Rename your devices and click OK. OBS should pick up your settings and devices with ease after these steps.
How to Reset OBS for Best Bitrate
First way to reset OBS for best bitrate: By manually increasing audio/video bitrate settings
Step 1: Open OBS
Launch OBS from your computer and ensure it is the latest version (get updates in-app or through obsproject.com)
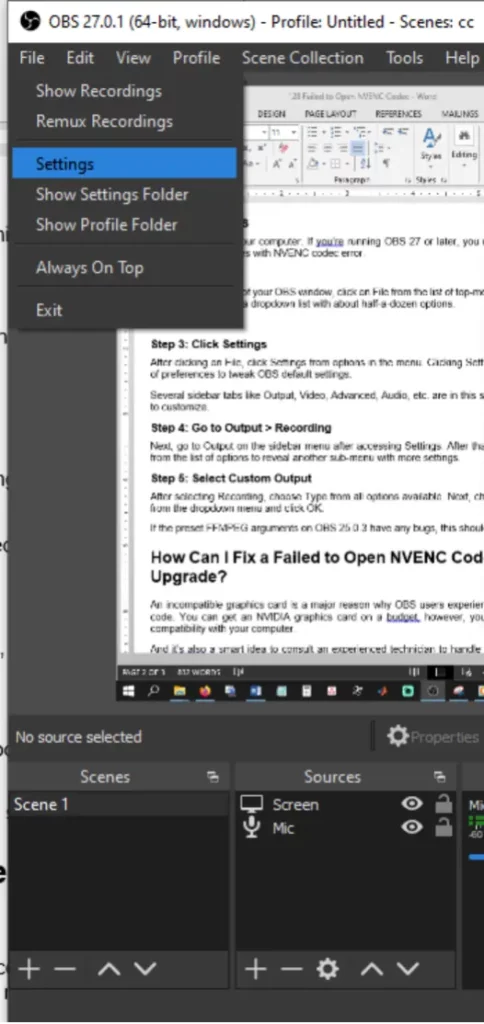
Step 2: Go to File > Settings
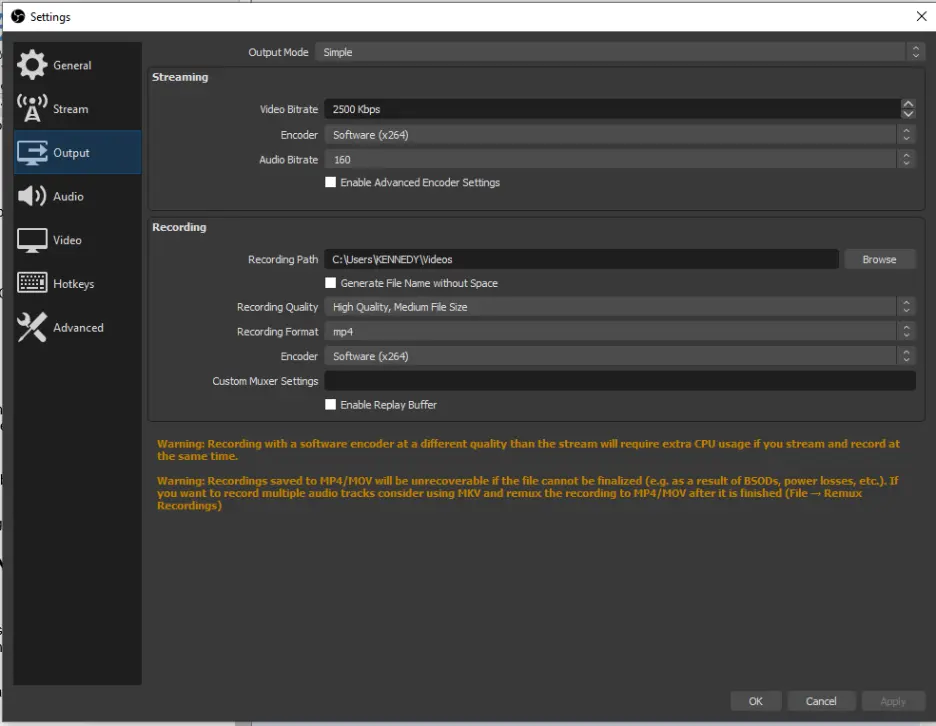
Next, click File and then Settings before going to the Output tab.

Increase your stream/recording bitrate by 30 units for audio and 500 units for video.
Second way to reset OBS for best bitrate: Through Network settings
Step 1: Click Advanced > Network
After getting into the Settings menu, click Advanced and Network to access network settings. In the Network tab. Check the box behind ‘Dynamically change bitrate to manage congestion’ and click OK.
How Can I Reset OBS for Use with Low-End PCs?
OBS for low-end PCs can work smoothly with simple audio, encoder, output, rate control, and bitrate settings. You can set your preferred audio track to default, choose NVIDIA NVENC as your favored encoder and bitrate to 2500-3000Kbps.