Open Broadcaster Software (OBS) offers several excellent features designed to make streaming and offline recording seamless. One of the standout features of OBS is its ability to create a noise gate to handle background sounds. It is important to properly set the OBS noise gate settings for the best output.
OBS noise gate settings are accessible through the main Settings menu. Users can create a threshold for OBS to ignore sounds below a given decibel rating, supporting clearer audio streams overall.
In this article, we will explore OBS noise gate settings and how to optimize them for crystal-clear audio in your streams.
Understanding Noise Gates
Before diving into OBS noise gate settings, let’s understand what a noise gate is and how it works.
A noise gate is an audio processing tool that allows you to control when and how audio is transmitted. It works by setting a threshold level, below which the audio is muted or reduced. When the audio signal goes above the threshold, the noise gate opens, allowing the sound to pass through.
How to Set Noise Gate in OBS
Step 1: Open OBS
Launch the OBS app already installed on your computer. It’s better to update your OBS app to its latest version to get access to better features and relevant fixes.
Step 2: Create an audio input source
On the Sources tab, click ‘+’ and audio input from the options available. Select your microphone as the default audio input source, rename it (optional), and click OK.
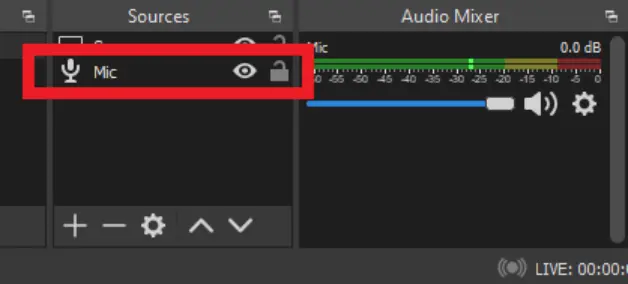
Step 3: Left-click the gear icon in the Audio Mixer window
Next, locate the gear icon beside your newly created audio input source. Clicking on the icon reveals a set of options and effects.
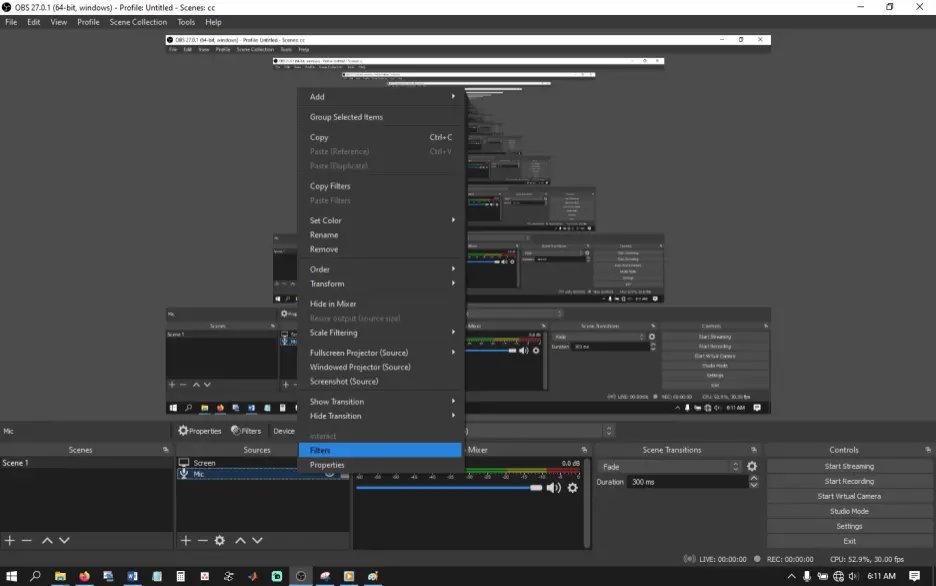
Step 4: Select Filters
Next, click Filters from all options available.
Step 5: Click + and choose Noise Gate
At the Filters sidebar, click on ‘+’ and choose Noise Gate from the options on display.
Step 6: Name your filter and click OK
Rename your filter and click OK.
Step 7: Adjust open/close threshold as desired
Check for your standard close threshold and make sure it is above your standard noise volume. Also, confirm that the open threshold is below your regular voice input.
Getting these two ratings (in decibels) makes it easy to get your noise gate set properly for the best results.
Step 8: Click Close
Clicking Close completes the entire noise gate setup, creating two thresholds to improve your audio input on OBS.
What is a Good Noise Gate Threshold OBS?
The best noise gate close threshold for OBS should be above the regular noise volume of your environment (minus background noise). An excellent noise gate should have an open threshold just above your standard voice input for better audio.
Setting a proper noise gate allows you to record offline and stream content with impeccable audio quality.
How to Make a Good Noise Gate in OBS
Step 1: Open OBS
Launch the OBS client app installed on your computer. Consider updating your OBS app to its latest version before setting a suitable noise gate.
Step 2: Test open/close threshold
Test the default open and close threshold of your audio input. You can find the default OBS noise gate settings in the Audio Mixer tab.
Step 3: Open Audio Mixer settings
After opening the Audio Mixer menu, select Filters from all available options.
Step 4: Click + and choose Noise Gate
Next, click ‘+’ and choose Noise Gate from the entire options available.
Step 5: Name your filter and click OK
Rename your noise gate filter if you want and click OK
Step 6: Adjust open/close threshold as desired and click Close
Tweak your OBS thresholds to accommodate your voice input and noise volume. OBS will not pick up any sound outside the open and close threshold.
What are the Best OBS Noise Gate Settings?
The best OBS settings for noise gate are:
- Noise suppression: ON
- Close threshold (dB): ~-60dB
- Open threshold (dB): ~-38dB
- Attack time: 15-20 milliseconds
- Release time: 80-100 milliseconds
- Hold time: 170-200 milliseconds
Note that these settings will differ based on your background noise intensity, type of voice, environment, etc. These figures are a guide, but you may get better output after tweaking settings to suit your voice and environment.
What are the Best OBS Mic Filter Settings?
The best mic filter setting for background noise and surround disturbance limitation is OBS’s default. Users can tweak the open/close threshold, and attack/hold/release times, as desired.
How to Use Noise Limiters in OBS
Step 1: Open OBS
Launch OBS from your PC and go to the Sources tab. Next, go to the Sources tab and create an audio input source if you’ve not created any earlier.
Step 2: Right-click audio source
Next, right-click on the audio source on your preferred scene. A pop-up menu with at least a dozen settings will appear.
Step 3: Select Filters from the options
Choose ‘Filters’ from the list of options. Selecting Filters will open a custom Filters sidebar with more options.
Step 4: Click on ‘+’ from Filters sidebar, then select Limiter and click Close
On the Filters sidebar, click the ‘+’ icon and choose Limiter from all options available.

Rename your limiter filter as desired and click Close.

OBS Noise Gate Settings: Summing Up
One common issue that streamers face is background noise, which can be distracting and diminish the overall quality of your content. With the right OBS noise gate settings, you can eliminate unwanted background noise and deliver crystal-clear audio in your streams.
By understanding the different parameters and fine-tuning them to your specific needs, you can significantly enhance the overall quality of your content. Experiment, test, and don’t hesitate to make adjustments until you achieve the perfect balance between your voice and the elimination of background noise.
Frequently Asked Questions (FAQs)
1. Why is background noise a problem in streams?
Background noise can be distracting and reduce the overall quality of your content, making it harder for your audience to focus on your voice.
2. Can I use OBS noise gate settings for any microphone?
Yes, you can apply OBS noise gate settings to any microphone or auxiliary audio device you use in OBS.
3. How do I know if my noise gate settings are optimal?
Test your audio by streaming or recording and listen for any unwanted background noise or audio cuts. Fine-tune the settings until you achieve the desired results.
4. Can I use noise gate settings for other audio sources besides microphones?
Yes, you can apply noise gate settings to any audio source in OBS, such as music or game sounds.
5. Do I need to adjust my noise gate settings regularly?
It’s recommended to periodically monitor and adjust your noise gate settings based on changes in your microphone setup or recording environment.