OBS provides the user with the option of switching to a virtual microphone with the help of an audio cable. A lot of people search for ways of doing it. Here’s how you can switch to a virtual microphone.
The audio port of your computer can be turned into a virtual audio cable with the help of OBS. Use your CABLE Output to insert your mic and change your desired settings to enjoy the virtual microphone.

Can you use the virtual microphone on OBS? What is the quality?
You can certainly use the virtual microphone on OBS using VB-Audio Cable software. VB-Audio cable gives the user the option to add a virtual input and output audio cable to the computer.
The computer thinks that there is a real audio cable plugged in when using this software. Then when we go back to OBS we can use this virtual audio cable to create a virtual microphone and add filters or suppression to it to please our needs. To use this VB-Audio cable to make a virtual microphone we will need a microphone or any other input device.
The quality of the virtual microphone is really good. If set up properly the microphone can sound as you prefer. It is helpful if the original microphone sound is good then when filters or suppression are added to that mic the sound doesn’t get muffled.
Is the OBS virtual microphone difficult to set up?
The virtual microphone is hard to set up depending on the knowledge of the user. For the average user, it is considered complicated and hard to set up.
How to set up Zoom to use the virtual microphone on OBS?
After setting up the VB audio cable and OBS virtual microphone settings properly then the user can set up Zoom to use the virtual microphone. For this, the user needs to open Zoom and create a meeting. After that, the user needs to follow the steps mentioned below.
- First, the user needs to press the upward arrow icon beside the microphone icon situated in the bottom left. By default, the default microphone of the user should be selected.
If the user sets the VB audio cable properly then there should be an option to switch the audio input source/ microphone to ‘CABLE Output (VB-Audio Virtual Cable)’. Then the user needs to switch to that option.
- When the virtual cable is selected the OBS streaming application uses the original microphone to record audio and then monitors that audio and inputs the audio into the virtual cable input device then it goes through the added processing like filters, noise suppression, volume adjustments, et cetera. Then it comes back out through the output device. Here the ‘CABLE Output (VB-Audio Virtual Cable)’ is that virtual output device.
- After selecting the ‘CABLE Output (VB-Audio Virtual Cable)’ as the microphone the stream will switch to the virtual microphone.
What are the steps to set up a virtual microphone on OBS?
Setting up a virtual microphone requires many steps and it gets very confusing after some time but if the steps mentioned below are followed properly it should be very easy to complete the setup.
The steps are:
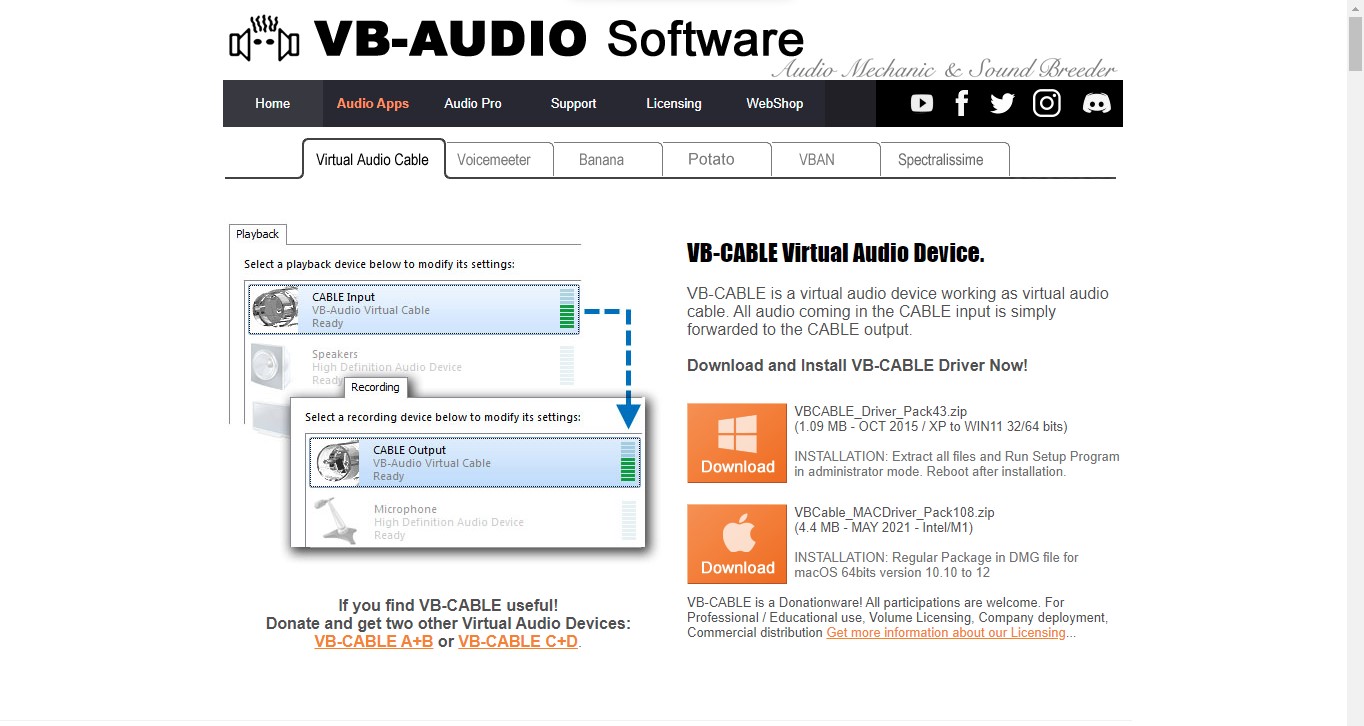
- First, you need to install VB-Audio Cable. So, go to this link: https://vb-audio.com/Cable/ and download the Windows driver if you are using Windows or if you are using Mac OS, then download the Mac OS drivers.
- After completing the download extract the VB-Audio Cable zip file. Then go to the extracted folder and right-click on VBCABLE_SETUP_x64 if the system is running on the x64 operating system or right-click on VBCABLE_SETUP if the system is running on the x84 operating system and run it as an administrator.
- Then there will be an option to install the driver. Press that and it should be installed. You might be requested to reboot the computer and as requested reboot the computer if needed.
After the installation
- After completing the installation, make sure you changed the speaker to your default speaker from VB Cable.
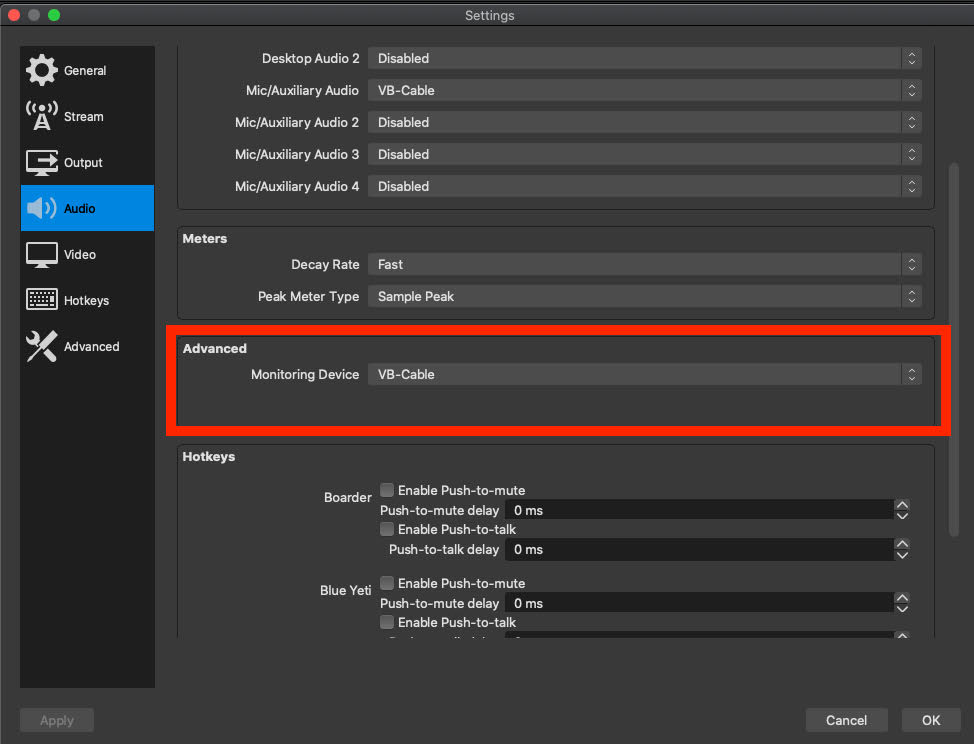
- Then go back to OBS and go to settings. Go to the audio tab and check the advanced section and click on the monitoring device and select ‘CABLE Input (VB-Audio Virtual Cable)’. Then press the apply button and press ok.
- Now in the audio mixer section of OBS, you will see the default microphone that is plugged into your computer. Below the default microphone name, there should be a gear icon, press that and then press the advanced audio properties option.
- Then change the audio monitoring option of the default microphone and set it to Monitor and output.
- Now the virtual microphone is set up.
Now the default microphone is recording audio and it is going into the VB cable and it acts like a speaker. The speaker is being monitored using OBS and it is being outputted to the ‘CABLE Output (VB-Audio Virtual Cable)’.
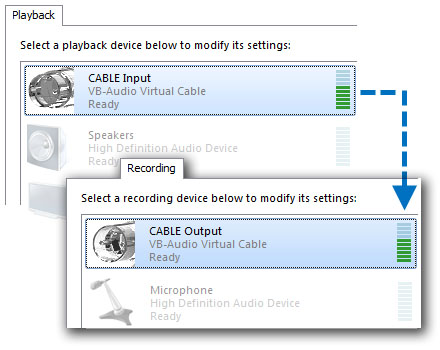
The ‘CABLE Output (VB-Audio Virtual Cable)’ is our virtual microphone. Now, the user can add noise suppression, voice-changing effects, volume and pitch adjustments, and other filters to the audio.
The user needs to keep in mind that to use the virtual mic OBS needs to be kept open always. To use the virtual microphone, the user will need to select the ‘CABLE Output (VB-Audio Virtual Cable)’ device as their default mic for the app that they will be using.