Have you desired ways to connect to two internet service providers (ISPs) at the same time? With the UDM Pro Dual WAN feature from Ubiquiti, it’s now a reality.
The UDM Pro Dual WAN feature supports load balancing that allows users connect UniFi devices to two ISPs at once. UniFi USG and UDM models also support two ISPs at once.
Configuring your UniFi device to accept and connect to two devices at once might be hard without correct information. But with the information this guide offers, you’ve got nothing to worry about.
The steps and tips in this article allow users connect with dual WAN on their supported UniFi devices. Other relevant information to help you get the best experience from your dual WAN-enabled devices are presented in this post.
Does UDM Pro Have Dual WAN?
The UniFi UDM Pro supports dual WAN networking that allows users connect to two ISPs at once. With the dual WAN feature, users can get guaranteed seamless links to their devices remotely.
Currently, the UDM Pro only supports dual WAN through the failover mode, unlike USG models. You have to complete some settings to activate dual WAN on your UDM Pro as it doesn’t come active in default settings.
How to Set Dual WAN on UDM Pro
Step 1: Connect your UniFi network to two different WAN interfaces
A couple of WAN ports feature at the rear of your UniFi Dream Machine (UDM) Pro. Connect your ISP uplink to each of the ports (port 9 and 10 in most UDM Pro models)
Step 2: Go to Settings > Internet
Next, go to Settings and then Internet from the list of options available. After that, click on Create to open a preferences window for your new WAN network.
Step 3: Create WAN 2 network
Enter the correct settings for your WAN 2 network and confirm your settings.
Step 4: Click Advanced and enter setup details before clicking Apply
When you’re done with setting up the WAN, click Apply before proceeding to your connected devices.
Step 5: Go to UniFi Devices
Next, select UDM Pro from the list of connected devices and select Properties from its dedicated menu.
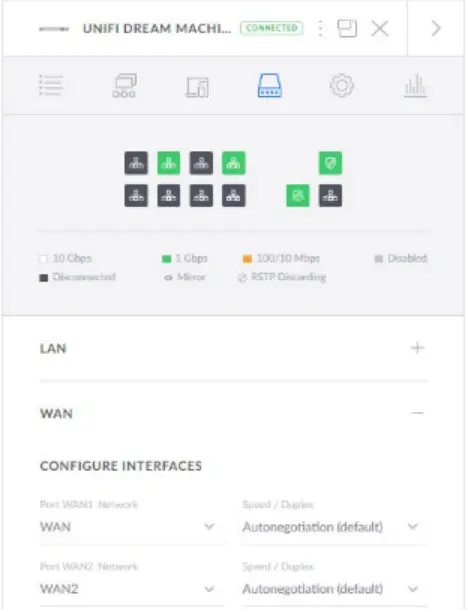
Step 6: Select Ports > WAN Ports and click Configure Interfaces
At the Configure Interfaces section, you can assign WAN networks connected to your UDM Pro.
Step 8: Go to Devices > UDM > Details to confirm WAN interfaces
You need to visit Devices to access any UniFi device currently connected to the network. Next, click on your UDM Pro device and select Details from options available.
After that, verify if your connected WAN interfaces are live. Also, check if these interfaces currently run with an IP address.
Your WAN interface has to be live and using an active IP. If it is disconnected and running without an IP, then your WAN settings don’t match that of your ISP.
What is Dual WAN Load Balancing?
Dual WAN load balancing is a feature networking devices possess to support traffic from two wireless networks at once. Dual WAN load balancing does not require any complex protocols to support these networks.
The feature allows balancing for Web, email, and other compatible network sessions.
Does UDM Pro Support Load Balancing?
The UDM Pro supports failover load balancing mode. However, the UniFi Security Gateway (USG) supports dual WAN load balancing across all models.
How to Set WAN Load Balancing on UDM Pro
Step 1: Go to Settings > Internet
Connect and launch UDM Pro on your computer. After that, click Settings, and then Internet from the list of available options.
Step 2: Create new WAN network, click Advanced and enter settings
Next, create a new WAN network from the Internet section and rename it as ‘WAN2’.
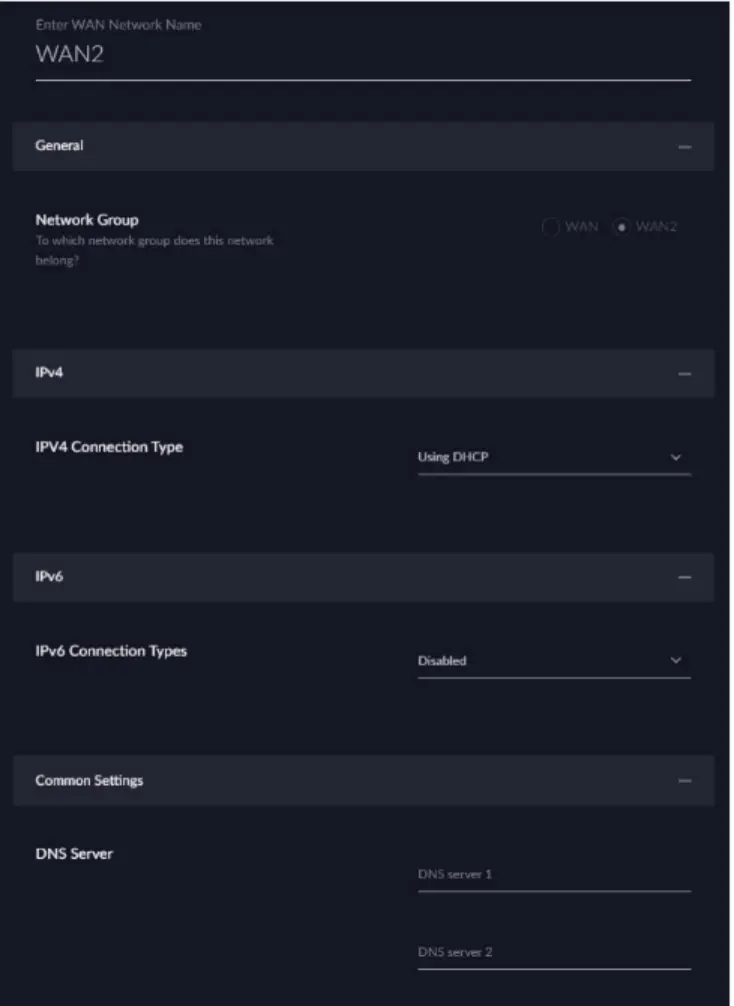
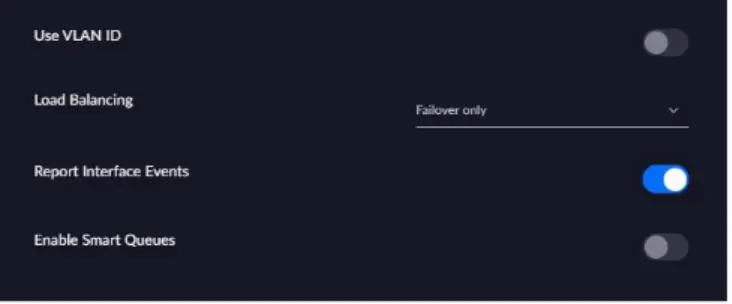
Click Advanced and enter the details below as your preferred settings.
Network Group: WAN2
IPv4 Connection Type: (ISP-dependent)
IPv6 Connection Types: (ISP-dependent)
DNS Server: Optional
USE VLAN ID: Optional (ISP-dependent)
Load Balancing: Failover Only / Weighted LB
Load Balancing Weight: 50 or customized
Enable Smart Queues: Optional
Step 3: Apply changes and go to Devices
Next, click on Apply Changes to confirm your settings. Go to Devices from your UniFi network menu.
Step 4: Click UDM Pro > Properties
Click on UDM Pro from this list of connected network devices.
Step 5: Go to Ports > WAN Ports > Configure Interfaces
Go to Ports, locate WAN ports from all tabs available in this menu and click on Configure Interfaces.
Does UDM Pro Dual WAN Increase Download Speed?
The UDM Pro dual WAN feature has no effect on download speeds from ISPs. It only allows users get an alternative to access connections if their main WAN linkup is out of service.