Network Attached Storage (NAS) is dedicated file storage available on a network. It is connected to a network that allows storage and retrieval of data from a centralized location for authorized network users, accessed through a local area network (LAN) via a standard Ethernet connection.
You can add Network Attached Storage (NAS) to the existing home infrastructure. You can access any device from anywhere, using your UniFi logins or local account configurations.
Table of Contents
Does Ubiquiti make a NAS?
Ubiquiti doesn’t have its own NAS version.
As of the moment, Ubiquiti doesn’t produce NAS. The company has great potential. However, Ubiquiti struggles to release a reliable firmware version for critical devices.
Nobody would like to lose data due to a bad firmware version or software update. Therefore, purchase a NAS from a dedicated storage firm instead. You can find guaranteed robust NAS devices in the market, such as Synology NAS, TerraMaster, QNAP TS-253D, and ioSafe 218 NAS.
Does Ubiquiti work with Synology NAS?
Sonology NAS works with Ubiquiti
Unifi Controller can work on a Synology NAS flawlessly. In fact, lots of users have positive comments about Synology NAS as one of the best appliances to run the Unifi Controller. Synology NAS is a smart multi-functional Network-Attached Storage server, serving as a file-sharing center within an organization’s intranet. Authorized users can store family and associates’ files on the NAS, such as important documents, photos, music, video collections, and many more.
How do I run UniFi Protect on Synology NAS?
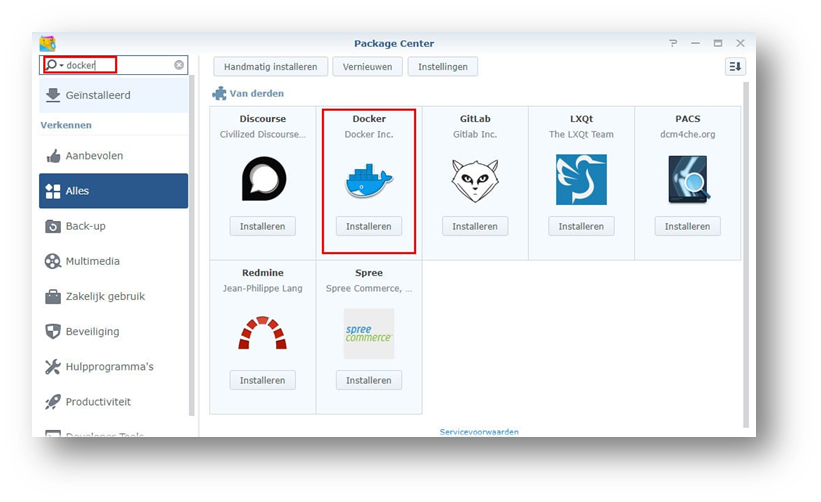
Step 1: Install a Docker Image
To successfully run Unifi Controller, a Docker image must be installed in the Sonology Nas first. A Docker allows users to run applications in containers, which lets the developer create a package like Unifi, Java, and MongoDB. Thus, allowing the user to download and start the image inside the container without damaging other applications.
To install, log in to your Synology Nas with an Admin user>Open the Package Center>Search in the top left corner for Docker>Install Docker (blue whale icon)
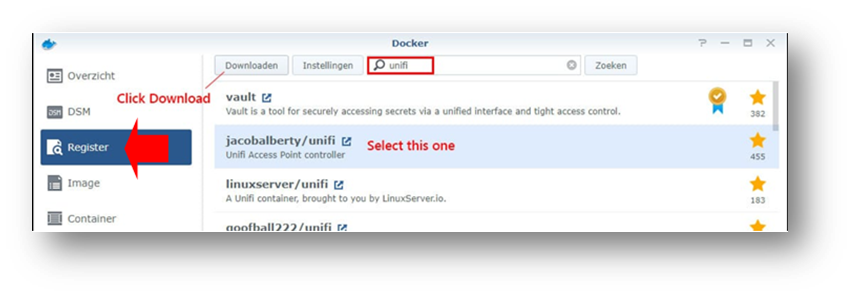
Step 2: Install the Unifi Controller
Download the Unifi Controller image (700Mb) and configure the Docker Container for it. On the Docker starts up, go to the register on the left side and search for Unifi. Choose jacobalberty/unifi and click on the download.
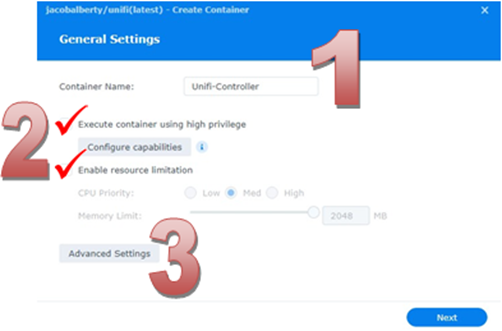
Step 3: Configure the Unifi Container
Once the UniFi Controller is installed, launch the container configuration wizard and modify the settings to access the Unifi Controller from another computer, store the files somewhere and limit the resources.
- General Setting – Name the container Unifi-Controller
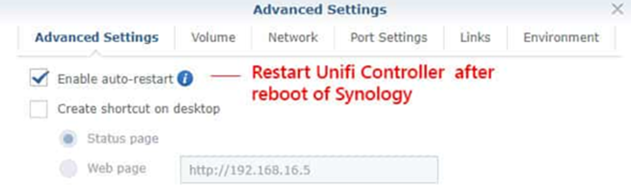
- Advanced Setting – Enable auto-restart
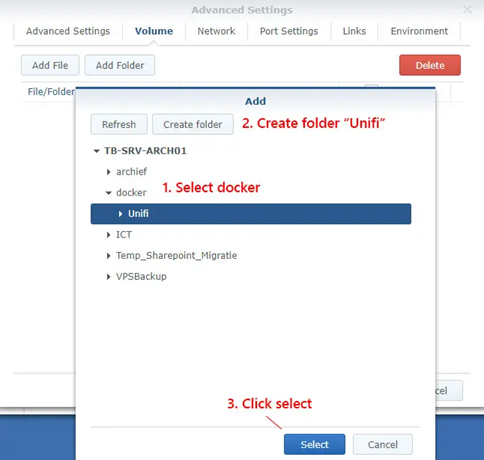
- Set the Disk Volume – Create a UniFi Controller subfolder and set the mount path as /unifi.
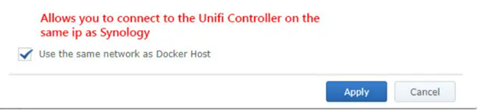
- Network Settings – Select Use the same network as Docker Host.
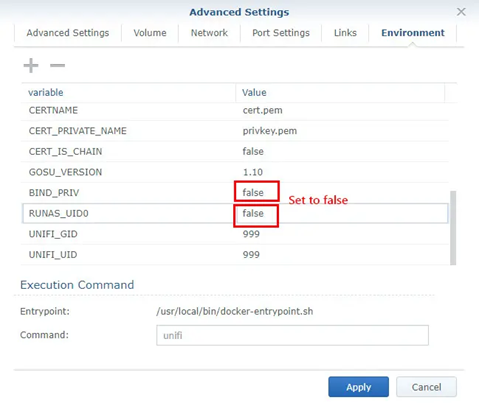
- Environment Settings – Add a new environment variable named TZ. Set the value to be your time zone. Set BIND_PRIV (bind to lower ports) and RUNAS_UID0 (run as root) variables into False.
The Unifi Controller is live and accessible on a Synology port 8443. So, if the Unifi Controller is https://192.168.1.2, then you can find the Unifi Controller on https://192.168.1.2:8443.
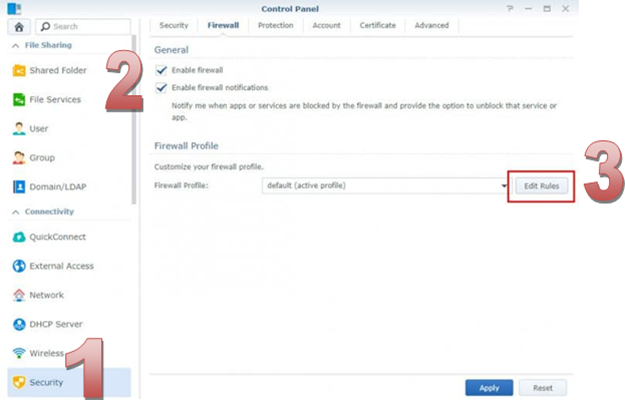
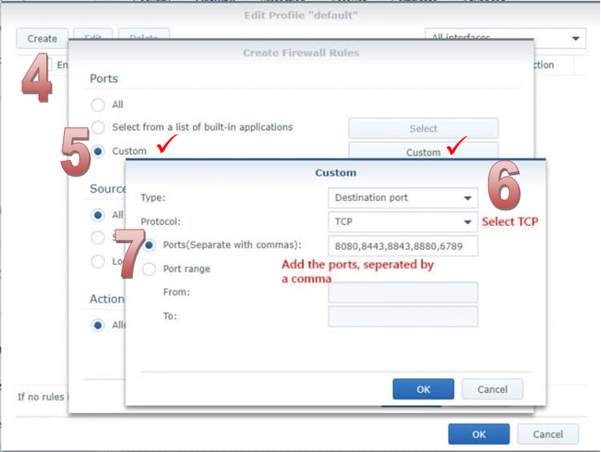
Step 4: Configure your Synology Firewall
Open some ports to allow traffic to the Unifi Controller.
Step 5: Update the Unifi Controller on the Synology
Download the latest version and run the installer inside the Docker container.
Step 6: Update the container
After the download of the Unifi Controller on the Sology, Start updating or replacing the Docker image.
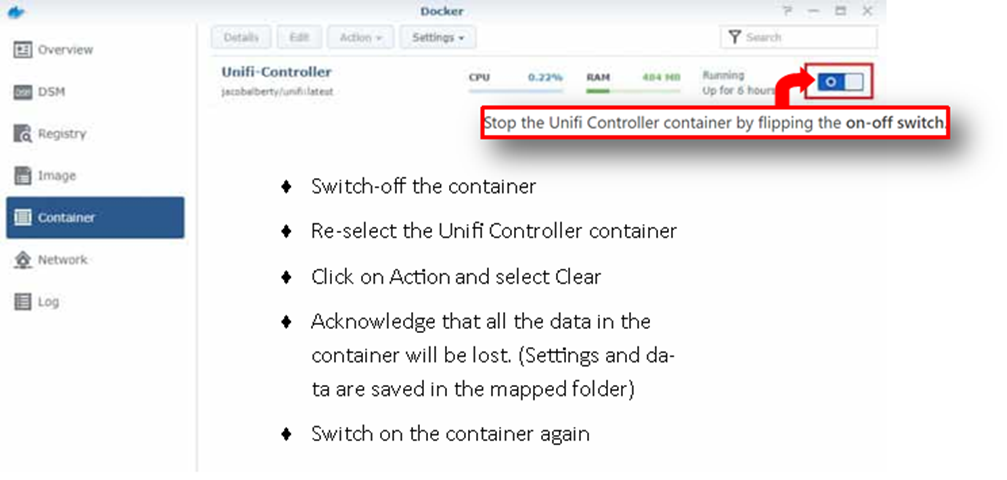
- Switch-off the container
- Re-select the Unifi Controller container
- Click on Action and Select Clear
- Acknowledge that all the data in the container will be lost.
- Switch- on the container.
Can the Dream Machine Pro with an HDD work as a NAS for backups and storage?
The UniFi Dream Machine Pro (UDM-Pro) won’t be a NAS replacement
The UniFi Dream Machine Pro (UDM-Pro) is the latest security gateway from Ubiquiti which comes with a built-in firewall and advanced threat management system. It runs every UniFi OS application, including the pre-installed UniFi Network. UDM-Pro provides an NVR and can run a controller and a couple of other apps. However, you cannot make it into a Network Attached Storage (NAS).
Still, it is possible to turn it into a NAS. However, users are more likely to redo it every time there is a firmware update. The UniFi Dream Machine Pro (UDM-Pro) can’t serve as a NAS replacement.
Can I use a NAS as an external hard drive?
No, you cannot use Network Attached Storage (NAS) as an external drive.
Many refer to the Network Attached Storage (NAS) as the “hard drive with a brain” because of the flexibility and complexity of its function. However, the NAS cannot operate without being connected to Ethernet. Thus. it cannot be used as an external hard drive.